The procedure of installing dnscrypt in elementary OS is not that hard, however it’s not that obviously as well.
Installing dnscrypt
Just run:
sudo apt-get install dnscrypt-proxy
Creating a systemd service
I’d go with creating a systemd service to run dnscrypt.
Create the /etc/systemd/system/dnscrypt.service file with the following content:
(you can use sudo nano /etc/systemd/system/dnscrypt.service to create the file)
[Unit]
Description=DNScrypt
After=NetworkManager.service
[Service]
ExecStart=/usr/sbin/dnscrypt-proxy -R cisco -a 127.0.0.2:53
ExecReload=/bin/kill -HUP $MAINPID

[Install]
WantedBy=basic.target
You’d replace cisco with any other resolver you want. You can find the list
of available resolvers here.
Then, run:
sudo systemctl daemon-reload
sudo systemctl enable dnscrypt.service
sudo systemctl start dnscrypt.service
It’d start. To check it, run
sudo netstat -tulpn | grep dnscrypt-proxy
You’d see something like this:
tcp 0 0 127.0.0.2:53  0.0.0.0:* LISTEN 3220/dnscrypt-proxy
udp 0 0 127.0.0.2:53  0.0.0.0:*        3220/dnscrypt-proxy
This means dnscrypt works :)
Configuring elementary OS
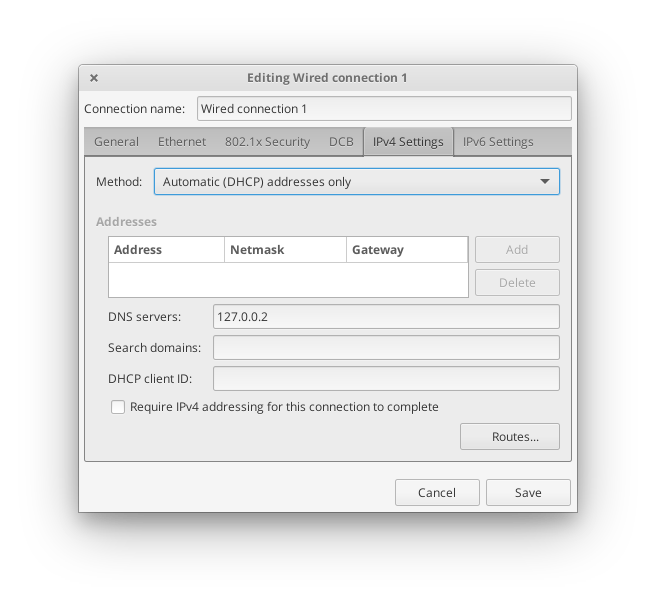
Open Settings - Network. Select your device in the left toolbar, press “Advanced Settings…”.
Open the “IPv4 Settings”, choose the “Automatic (DHCP) addresses only”.
In the “DNS servers” input, type 127.0.0.2. Click the save button.
Open the terminal and run
sudo systemctl restart NetworkManager.service
You’d reconnect to your network. You can visit this site to test if it’s working for you.
That’s all. If you have any questions, feel free to ask in the comments section.